• Going Out
    • Phx Restaurants
    • How To Order At Starbucks
  • Running
    • My Running Story
    • Race Calendar
    • Race Recaps & Results
  • Blogroll
  • Bucket List
  • Video

Ari's Menu

Little changes making a big difference.

  • Home
  • Recipes
  • Weight Loss
    • My Story
    • Common Swaps
  • Who’s Who
  • Contact
    • Policies & Disclosure
  • Press

Pesto Pizza {with roasted red pepper, tomato and roasted corn}

August 21, 2013 · by Ari · 26 Comments

Pesto Pizza with roasted red pepper, tomato and roasted corn

If I had to choose one food to eat for the rest of my life and cilantro didn’t count, I would probably choose pizza. Goat cheese is right up there too, but I would just put the goat cheese ON the pizza. In fact, I kind of can’t believe I didn’t put it onĀ this pizza. You could though. It would be delicious.

Pesto Pizza with roasted red pepper, tomato and roasted corn

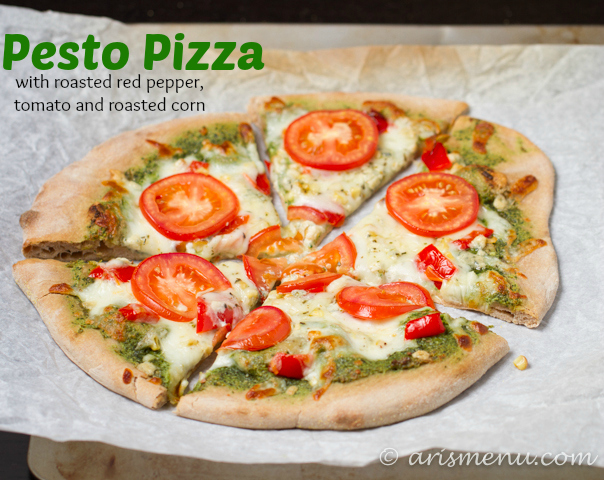
I mean, you really can’t go wrong with carbs and cheese. My two favorite food groups. Add in some homemade ricotta pesto, and you’ve got yourself a ridiculously easy and impressive homemade pizza for any day of the week!

Pesto Pizza with roasted red pepper, tomato and roasted corn

The pesto and the corn are without a doubt my favorite part. I loved the pesto on it’s own, and on a pizza it got EVEN BETTER. Plus, I looooove roasted corn, especially in the summer. I seek it out on menus when I go out to eat, and put it in almost everything I make at home. Sweet and crisp–it takes almost any dish to the next level!

Pesto Pizza with roasted red pepper, tomato and roasted corn

Print
Pesto Pizza {with roasted red pepper, tomato and roasted corn}

Prep Time: 10 minutes

Cook Time: 30 minutes

Total Time: 40 minutes

Yield: 3-4 servings

Pesto Pizza {with roasted red pepper, tomato and roasted corn}

Ingredients

  • 1 lb whole wheat pizza dough (I used Trader Joe's brand), at room temperature
  • 1-2 tbsp cornmeal
  • 1 batch ricotta pesto
  • 6-8oz freshly shredded part skim mozzarella
  • 1 red bell pepper, roasted and chopped
  • kernels from 1 ear roasted corn
  • 2 roma tomatoes, sliced
  • heavy pinch oregano
  • pinch pepper

Instructions

  1. Preheat oven to 450. If using a pizza stone, leave it in the oven for 30 minutes. Sprinkle cornmeal over a sheet of parchment paper. Place dough on parchment paper and roll into desired shape. Alternately, use your hands to stretch it out into desired shape, then place on parchment paper.Transfer to pizza stone or baking sheet and bake for 10 minutes.
  2. Remove from oven and evenly spread pesto over the pizza. Top with cheese, corn and sliced tomatoes. Sprinkle oregano and pepper on top.
  3. Bake until crust is cooked throughout and cheese is bubbling, about an other 15-20 minutes. Let stand for 5 minutes, then slice and serve.
3.1
http://www.arismenu.com/pesto-pizza/

Filed Under: Entree, Holiday & Seasonal, pizza, Vegetarian · Tagged: corn, dinner, lunch, pesto, pesto pizza, pizza, recipe, ricotta pesto, vegetarian, whole grain pizza

Thai Chicken Kabobs

July 31, 2013 · by Ari · 11 Comments

Thai Chicken Kabobs

Is there anything more fun than food on a stick? I mean, sure, eating it can be tricky and you run the risk of stabbing your husband while playing swords with your food (because that’s a totally normal and acceptable thing to do, yes?), but really, how many foods can you make into a sword anyway?

Thai Chicken Kabobs

I’ve actually never made kabobs before this one, and let me tell you, I am in love. I loved having my chicken on my veggies all on one stick. I loved how fun they were to eat and dip in the peanut sauce, and I also loved how food on a stick meant there were next to no dishes to clean up. Seriously, I hate cleaning almost as much as I love cooking.

Thai Chicken Kabobs

The chicken marinates in the peanut sauce to soak up all that delicious Thai peanut flavor, then gets grilled up with your veggies and dunked in lots more peanut-y deliciousness as you eat. You end up eating a lot less of the calorie-dense peanut sauce than if you were to eat traditional Pad Thai. Not to mention getting rid of the noodles and adding a bunch of veggies gives you all the flavors of classic Pad Thai with a fraction of the calories, and sticking it all on kabob skewers to grill up gives them an awesome summery touch!

Thai Chicken Kabobs

They are topped off with fresh cilantro (my favorite food–I don’t care if you say it’s an “herb”, it’s still my favorite) and drizzles with sriracha for an extra spicy kick. Of course, those are option if you’re one of those weirdos who doesn’t like spicy food, or worse, you have that genetic “mutation” where you don’t like cilantro. Have you heard about that? Apparently it’s a genetic thing where to some people it tastes like soap. So glad I pulled the long straw on that one. šŸ˜‰

Print
Thai Chicken Kabobs

Prep Time: 1 hour, 15 minutes

Cook Time: 5 minutes

Total Time: 1 hour, 20 minutes

Yield: 9 kabobs

Serving Size: 3 kabobs

Thai Chicken Kabobs

Ingredients

  • 1/2 cup peanut butter
  • 1 1/2 tbsp fresh lime juice
  • 1 tbsp coconut aminos or soy sauce
  • 1 tsp sriracha + extra for drizzling
  • approx 1/2 cup water, divided
  • 1 1/2 lbs boneless skinless chicken breast, cut into 1" chunks
  • 1 large red bell pepper, cut into 1" chunks
  • approx 1 cup sugar snap peas
  • 1/2 red onion, cut into 1" chunks
  • fresh cilantro, optional

Instructions

  1. In a medium bowl, whisk together peanut butter, lime juice, coconut aminos, sriracha and 1/4 cup water. Remove half the mixture (eyeball it), cover and set aside.
  2. Add 1/4 cup water to remaining mixture. Whisk to combine. Continue to slowly add water until it has reached the consistency of a marinade. I used about 1/4-1/3 cup. Place chicken and marinade in a large freezer bag or medium tupperware and marinate in the refrigerator for 1 hour (alternately, feel free to do this step up to 24 hours ahead of time).
  3. If using wooden skewers, soak skewers for 30 minutes before cooking (if you use metal, this is not necessary). Alternately place chicken, bell pepper, onion, and snap peas onto your skewers (you will most likely have room for about 2 of each) close together, but not crowding.
  4. Grill on medium-high heat until chicken is cooked throughout, about 5-7 minutes. Sprinkle with fresh cilantro and drizzle with srirach. Serve immediately with remaining peanut dipping sauce.

Notes

You may wish to heat the peanut sauce before serving. It can get quite thick while it sits, so microwaving for about 15 seconds and adding a tablespoon of water should get it back to your ideal consistency.

3.1
http://www.arismenu.com/thai-chicken-kabobs/

Filed Under: Entree, Gluten-free, Holiday & Seasonal, Low Carb, Paleo · Tagged: chicken, dinner, gluten free, grilling, peanut butter, recipe, summer, thai

Macadamia Crusted Halibut

July 16, 2013 · by Ari · 17 Comments

Macadamia Crusted Halibut #paleo

For most of my life, I hated seafood. Anything other than canned tuna was totally out, and I wouldn’t even dream of giving it a try. I passed up cedar-grilled salmon, spicy shrimp, and never knew that swordfish tasted like steak and chilean sea bass tastes like butter (serious, it does). I missed out on a ridiculous amount of awesomeness, and now that I LOVE fish, I still rarely make it at home. I forget that I love it, and because it’s still fairly new to me, I don’t always know what to do with it.

Macadamia Crusted Halibut #paleo

People are always crusting fish with macadamia nuts and, well, macadamia nuts are AWESOME, so I figured this dish would be a sure thing. That’s the way I like it. No stress, don’t have to work too hard to make something awesome–just use awesome ingredients and your dish will be, well, awesome. How many times can I say awesome in one post? Awesome awesome awesome awesome awesomeawesomeawesome. It’s like when you repeat a word too many times and then it doesn’t even make sense anymore.

Macadamia Crusted Halibut #paleo

This dish is a perfect healthier grilling option. It’s grain and dairy free using only fresh, whole ingredients. It also fits into the paleo and whole 30 diets (if you buy organic) that everyone and their mom are doing right now. I’m not. I just like fish. And macadamia nuts. And coconut. Really, I just like food in general.

Macadamia Crusted Halibut #paleo

The macadamia nuts and coconut add a great buttery flavor and lightly brown at the bottom for some crispness. Halibut is a mildly flavored fish, so even if you’re like the Ari-of-10-years-ago and think you hate fish, you will probably love this, but you could always use chicken if you’re really against the sea, or any fish of your choosing. It’s a simple recipe with only 5 ingredients that’s easy to play around with and change up, and it comes together in minutes!

Print
Macadamia Crusted Halibut

Prep Time: 5 minutes

Cook Time: 6 minutes

Total Time: 10 minutes

Yield: 2 servings

Serving Size: 1 x 6-8 oz halibut fillet

Macadamia Crusted Halibut

Ingredients

  • 2 x 6-8 oz halibut fillets
  • 1 large egg white, beaten
  • 1/3 cup macadamia nuts, crushed or finely chopped
  • 2 tbsp unsweetened shredded coconut
  • 3 tbsp finely chopped parsley + extra for garnish
  • pinch each salt and pepper

Instructions

  1. Place beaten egg white in a wide, shallow bowl. In a separate large shallow bowl, toss together macadamia nuts, coconut, parsley, salt and pepper.
  2. Dip one halibut fillet in egg whites coating completely, then submerse in macadamia mixture. Press coating in lightly and ensure that the fish is fully covered. Repeat with remaining fillet.
  3. Wrap each fillet in aluminum foil and grill over medium heat for about 3 minutes per side. Do not overcook. Fish should be tender and flaky. Serve immediately.
3.1
http://www.arismenu.com/macadamia-crusted-halibut/

Filed Under: Entree, Gluten-free, Low Carb, Paleo · Tagged: coconut, dinner, fish, nuts, paleo, recipe, whole 30

Turkey Sloppy Joes

July 4, 2013 · by Ari · 21 Comments

Turkey Sloppy Joes

The first time I ever heard of sloppy joes was when I was watching that movie with the Olsen twins. I think it’s called It Takes Two? With Kirstie Alley and they go to summer camp and find out that they were twins separated at birth, then they switch places? There’s a scene in the cafeteria where they have sloppy joes and then they have a food fight. Food fights always look fun in the movies, but the idea of being literally covered in food in real life is surprisingly unappealing to me. As much as I love food, I do not love it on my body instead of in it.

Turkey Sloppy Joes

Sloppy joes were just never something my mom made, so when I did finally have one, it seemed like a special treat and I fell in love. I tried to make them once before with no ketchup (I used tomato sauce) and no sugar. It tasted like bad meat sauce. It was a total failure, and I’m pretty sure I threw a temper tantrum during the time Steve ate his entire serving and went back for seconds. Anyway, I knew I needed to try again.

Turkey Sloppy Joes

This time, I stuck to the simple and traditional, and ended up with a total treat that made me feel like a little kid again. It was totally messy, and got all over my face and clothes in the best way possible. It had that sweetness you imagine with a sloppy joe without any refined sugar, and the sriracha adds a little kick that I love. But then again, I put sriracha on just about everything.

Turkey Sloppy Joes

This is one of those perfect healthy meal for anyone who has kids (or lives with people that act like kids), or just likes simple, delicious foods. It’s healthy, nutritious, super filling and so easy to make that you will be making it over and over again!

Print
Turkey Sloppy Joes

Prep Time: 5 minutes

Cook Time: 40 minutes

Total Time: 45 minutes

Yield: 4 servings

Turkey Sloppy Joes

Ingredients

  • 1 tsp olive oil
  • 1 sweet onion, finely chopped
  • 1 red bell pepper, finely chopped
  • 3 cloves garlic, minced
  • 1 lb lean ground turkey (I used 93%)
  • 3/4 cup reduced sugar ketchup
  • 2-3 tsp molasses
  • pinch each salt and pepper
  • dash worcestershire sauce
  • dash sriracha or other hot sauce, optional
  • whole grain buns for serving (whole wheat, brown rice, etc.), optional

Instructions

  1. In a large pan over medium heat, saute onion, bell pepper and garlic in olive oil until tender and fragrant, about 7-10 minutes. Add ground turkey and brown until cooked throughout.
  2. Stir in ketchup, molasses, salt, pepper, worcestershire and sriracha. Bring to a light boil. Reduce heat and simmer until thickened, about 30 minutes.
  3. Serve immediately on buns, or over a salad, or any way you like.
3.1
http://www.arismenu.com/turkey-sloppy-joes/

Filed Under: Entree, Gluten-free, Sandwiches · Tagged: dairy free, dinner, easy, gluten free, lunch, recipe, sandwich, sloppy joe, turkey

Green Chile Guacamole Burgers

June 30, 2013 · by Ari · 16 Comments


Disclaimer: This is a sponsored post. Recipe and all opinions are my own.
Green Chile Guacamole Burger

You guys, it is hot. I’m in Portland and it’s supposed to be perfect weather all summer long, but instead there is a heat wave, and it’s in the 90s which wouldn’t even be bad except for the fact that we live upstairs and there is no ac. It is gross. I want to be swimming in a pool with a margarita in hand eating burgers for dinner. Can we make that happen?

Green Chile Guacamole Burger

Before I left for Portland, I’m pretty sure we ate at least 2 hamburgers a week for about a month. I wish I was kidding. I never got sick of them because there are 5 billion combinations so it always feels like something new!

Green Chile Guacamole Burger

I’m pretty bad about waiting to decide what to make until the last minute, then I have to bat my eyelashes and beg Steve to go to the store and pick up whatever we need. Luckily, there is a Fresh & Easy right around the corner that we can get to in no time, and makes it incredibly easy to pick up last minute items. Their store brand fresh&easy is all natural ingredients, and super affordable, so it’s a win, win. With the last minute idea to make the burgers, I sent Steve to the store to get fresh&easy buns and guacamole.

untitled-1

The burgers came out AWESOME! Bold and spicy, and the fresh&easy guacamole was AWESOME!! The roasted green chiles and so much flavor and also help the burgers not to dry out (which can easily happen when using lower fat meat), and the grilled onions on top are like the icing on the cake!

Green Chile Guacamole Burger

Fresh & Easy has tons of options for summer grilling, and really is insanely easy to get in and out of quickly (think the oposite of going through Walmart, but still with great prices), and I even have a coupon for you! Click here to receive a $5 off coupon (expires 7/7/13).

Print
Green Chile Guacamole Burgers

Prep Time: 10 minutes

Cook Time: 10 minutes

Total Time: 20 minutes

Yield: 4 burgers

Serving Size: 1 burger

Green Chile Guacamole Burgers

Ingredients

  • 2 green chiles, roasted, seeds removed
  • 1 lb extra lean ground beef (or turkey)
  • 2 cloves roasted garlic, finely minced
  • generous pinch cumin
  • pinch each salt and pepper
  • 4 fresh&easy whole wheat buns (gluten-free may be substituted)
  • Approximately 1 cup fresh&easy guacamole
  • 1/2 onion, sliced
  • 2 roma tomatoes, sliced

Instructions

  1. Half roasted green chiles. Finely chop 1/2 of one of your chiles and slice the rest.
  2. In a medium bowl, combine finely chopped green chile, ground beef, garlic, cumin, salt and pepper until ingredients are just incorporated. Form into 4 equal-sized patties. Press your thumb down into the center of each patty to create a small indent.
  3. Grill over medium heat until burgers have reached desired doneness, about 5 minutes each side. Simultaneously grill the onion slices until browned. This will also take about 5 minutes on each side.
  4. Top buns with guacamole, cooked burgers and onions, reserved green chile slices and tomato. Serve immediately.
3.1
http://www.arismenu.com/green-chile-guacamole-burgers/

I was selected for this opportunity as a member of Clever Girls Collective and the content and opinions expressed here are all my own.

Filed Under: Dinner, Entree, Gluten-free, Holiday & Seasonal, Lunch, Sandwiches, savory, Summer · Tagged: burger, chile, dinner, grilling, guacamole, lunch, recipe, sandwich

BBQ Bacon Cheddar Dogs

June 25, 2013 · by Ari · 19 Comments

BBQ Bacon Cheddar Dogs

I’ve developed this kind of ridiculous hot dog obsession. Kinda like the hamburger one, but ya know, with hot dogs. A couple of weeks ago after the 3rd consecutive hot dog recipe, Hermano asked when the heck I decided I liked hot dogs so much.

BBQ Bacon Cheddar Dogs

The truth is, I’ve always been a fan, but unless it was an enormous Cost Co hot dog, it just never seemed like a full meal to me, and I always wanted a hamburger to go with it.Ā BBQ Bacon Cheddar Dogs

So I decided to make a hot dog that sounds sinful and over the top, but is really healthy enough to eat 2, or eat 1 with a big ol’ side of veggies which is more my style these days.

BBQ Bacon Cheddar Dogs

The low fat beef hot dogs combined with the center cut bacon add healthy meat options that are full of flavor. The Ā sweet barbecue sauce and roasted corn pair perfectly with the salty dog, and then everything is better with cheddar cheese. It’s like a fact. These babies are perfect for 4th of July, any summer cookout, or any time you feel like firing up the grill!

Print
BBQ Bacon Cheddar Dogs

Prep Time: 10 minutes

Cook Time: 10 minutes

Total Time: 20 minutes

Yield: 2 hot dogs

Serving Size: 1 hot dog

BBQ Bacon Cheddar Dogs

Ingredients

  • 2 low fat beef or turkey dogs (I used Hebrew National 45 calorie beef)
  • 2 whole grain hot dog buns (use gluten-free if applicable)
  • 1 slice center cut bacon, cooked and crumbled
  • 2 tbsp low sugar barbecue sauce
  • 2 tbsp roasted corn kernels
  • 2 tbsp roasted corn kernels
  • 2 generous pinches grated reduced fat sharp cheddar cheese
  • 2 pinches finely chopped scallions

Instructions

  1. Grill hot dogs over medium heat until warmed throughout, about 5 minutes.
  2. Place hot dogs inside buns and top each dog with ½ slice cooked bacon, 1 tbsp barbecue sauce, 1 tbsp roasted corn, a generous pinch of cheddar cheese and a pinch of chopped scallions. Serve immediately.
3.1
http://www.arismenu.com/bbq-bacon-cheddar-dogs/

Filed Under: Dinner, Entree, Gluten-free, Holiday & Seasonal, Lunch, Sandwiches, savory, Summer · Tagged: 4th of july, bacon, barbecue, cheese, dinner, grilling, hot dogs, lunch

Drink & Dish: Red, White & Blue Grilled Cheese

June 23, 2013 · by Ari · 23 Comments

Red, White & Blue Grilled Cheese.jpg

It’s almost the 4th of July!!!

Red, White & Blue Grilled Cheese

One of my very favorite holidays because I am obsessed with fireworks. I’m sure this is totally surprising information given that I am never a sucker for bright, sparkly things, but I can ooohh and ahhh for the entire fireworks show, and always get a little sad when they start going all crazy for the grand finale because that means it’s over.

Red, White & Blue Grilled Cheese

Maybe it’s because for years I never got to watch the fireworks? I’ve spent almost every summer since I was 15 years old at theatre camp. First as a student, then as a counselor, and the last few years as a teacher/director/choreographer. For most of those years, the camp was located at the top of this hill in the middle of nowhere White Salmon, WA. We were always in rehearsals at night, so I never got to get into town (a good 40 minute drive) to watch the fireworks.Ā Now camp is in Portland, and we light little sparklers and the kids get really into it which is fun in an entirely different way.

Red, White & Blue Grilled Cheese

You know what else I love about the 4th of July? RED WHITE AND BLUE FOOD!!! Last year, I made red, white and blue cookies, and they still stand as some of my all time favorite cookies. This year, I decided to go with something you could eat for lunch or dinner while celebrating America (you have to pronounce it Ah-murrr-kah).

Red, White & Blue Grilled Cheese

This sandwich….I just…I’m not sure I even have the words? I made it 3 times in 1 week. The brie cheese is so melty and dreamy, and then the goat cheese provides the perfect creaminess. Both of these cheeses pair perfectly with fruit, and the raspberry jam adds a bright sweetness the compliments the slightly tart bursting blueberries. It sounds crazy, but it just works. It works so well that you want to eat it every day for the rest of your life. You know I’m not usually a meal repeater, but I can’t get enough of this sandwich, and I can see it making a comeback all year long.

Check out the latest episode of Drink & Dish to learn the secret to making a perfectly melty grilled cheese, and make sure to also check out Nicole’s super fun 4th of July Citrus Splash. I mean, it has poprocks and it’s BLUE!

Print
Drink & Dish: Red, White & Blue Grilled Cheese

Prep Time: 5 minutes

Cook Time: 15 minutes

Total Time: 20 minutes

Yield: 2 sandwiches

Serving Size: 1 sandwich

Drink & Dish: Red, White & Blue Grilled Cheese

Ingredients

  • 4 slices whole grain bread (use gluten-free if applicable)
  • 2 tbsp reduced sugar raspberry jam (or jam or choice)
  • 1 1/2 oz goat cheese, at room temperature
  • 2 small handfuls fresh blueberries (preferably organic)
  • 2 oz light brie cheese, sliced, rinds removed

Instructions

  1. Heat a large grill pan, griddle or nonstick pan over medium-low heat.
  2. Spread 2 slices of bread with 1 tbsp each of jam. Spread remaining two pieces with softened goat cheese (evenly divide the 1 1/2 oz between the two slices). Place a handful of blueberries on each goat cheese slice and lightly press the berries into the cheese. Top each with 1 oz sliced brie. Place the jam side on top.
  3. Grill until the bottom is browned, about 5-7 minutes. Flip and continue cooking until both sides are browned and cheese is fully melted, about an other 5-7 minutes. Serve immediately.
3.1
http://www.arismenu.com/drink-dish-red-white-blue-grilled-cheese/

Filed Under: Drink & Dish, Gluten-free, Holiday & Seasonal, Lunch, Sandwiches, savory, Summer · Tagged: 4th of july, blueberries, brie, cheese, dinner, drink and dish, goat cheese, lunch, recipe, summer, vegetarian, video.sandwich

Black Bean Burger Salad

June 16, 2013 · by Ari · 22 Comments

Black Bean Burger Salad with Cilantro Lime Vinaigrette #glutenfree

In the summertime, the only things I crave other than burgers (and grilled food in general) are big, delicious, cool and refreshing salads. I’m not talking the kind of “salad” that is some lettuce thrown on a plate and then drowned with ranch dressing. My salads need to be loaded with flavor, and they have to have a little something special to keep me interested.

Black Bean Burger Salad with Cilantro Lime Vinaigrette #glutenfree

I also always love a new way to eat one of my favorite foods. I fell head over heels for these black bean burgers at first bite, and since I almost never make the same meal twice, I wanted a new way to enjoy them. I have to say, I like them even better this way!

Black Bean Burger Salad with Cilantro Lime Vinaigrette #glutenfree

The bold, spicy burgers balance perfectly with the fresh, crisp lettuce and cucumber, and the sweet tomatoes, peppers, roasted corn and dried cranberries. And that tangy, creamy goat cheese on top? Flavor heaven. Not to mention the sweet and spicy cilantro lime vinaigrette. It is legit the best salad dressing I have ever tasted.

Black Bean Burger Salad with Cilantro Lime Vinaigrette #glutenfree

If you don’t do dairy, you could leave the goat cheese off and replace it with avocado. I mean, you should probably just add avocado anyway to all things, but especially if you leave the cheese off. This salad is perfect for summer (or any time), and I even continued to make it with my left over black bean burgers for the entire rest of the week! You can also easily double or triple it if you’re serving a bigger group!

Print
Black Bean Burger Salad with Cilantro Lime Vinaigrette

Prep Time: 10 minutes

Cook Time: 1 hour

Total Time: 1 hour, 10 minutes

Yield: 2 servings

Black Bean Burger Salad with Cilantro Lime Vinaigrette

Ingredients

  • 2 ears corn
  • 1 tbsp olive oil
  • salt and pepper
  • 1 heart of romain, chopped
  • 1 cup cherry tomatoes, halved
  • 1 red bell pepper, chopped
  • 1 large cucumber, chopped
  • 1/3 cup dried cranberries
  • 2 black bean burgers*
  • 3 oz goat cheese
  • For the Cilantro Lime Vinaigrette:
  • 2 limes
  • 1/4 cup olive oil
  • 2/3 cup cilantro
  • 1/2 jalapeno, seeds removed
  • 1 clove garlic
  • 1 tbsp honey
  • 1 tbsp balsamic vinegar
  • 2 tbsp water
  • 1 tsp cumin
  • pinch salt

Instructions

  1. Drizzle corn with olive oil and season with salt and pepper. Roast at 400 until golden and tender, about an hour.
  2. Prepare the dressing by adding the zest of 1 lime, and the juice of two with all remaining ingredients in your food processor and pulsing until combined and smooth, about 1 minute.
  3. For the salad, gently toss together roasted corn, lettuce, tomato, bell pepper, cucumber, and cranberries. Transfer to serving dishes. Crumble 1 black bean burger and 1.5 oz goat cheese on top of each salad. Serve with prepared dressing.

Notes

*Store bought/frozen black bean burgers may be used. Cook per package instructions before adding to your salad.

**To keep vegan, avocado may be subbed for goat cheese and agave may be subbed for honey in the dressing.

3.1
http://www.arismenu.com/black-bean-burger-salad/

Filed Under: Appetizers, Dinner, Entree, Gluten-free, Holiday & Seasonal, Lunch, Salads, savory, Summer, Vegetarian · Tagged: beans, black bean burger, cheese, cilantro, corn, dinner, gluten free, lunch, recipe, salad, summer, vegetarian

Bacon Wrapped Gorgonzola Fig Burgers with Balsamic Glaze

June 10, 2013 · by Ari · 11 Comments

Bacon Wrapped Gorgonzola Fig Burgers with Balsamic Glaze

You can take a moment and judge my insanely long title, per usual. Okay, now that we’ve gotten that out of the way, I’m sure you think I’ve gone off the deep end. When I told my husband what I was making for dinner last week, he raised an eyebrow, and gave me a look that can only be described as “WTF”, then he said “You’re really on a burger kick, aren’t you?”

Bacon Wrapped Gorgonzola Fig Burgers with Balsamic Glaze

Guilty. And I guess after making countless burgers, you have to do something a little weird and put fruit inside. Or at least I do.

Bacon Wrapped Gorgonzola Fig Burgers with Balsamic Glaze

I’m pretty much obsessed with anything sweet and savory. I used to think it was weird, but ever since people starting salting things (I soooo judged that salted caramel hot chocolate at the bux for a good 2 weeks), I haven’t tired of the depth of flavor adding an unexpected taste or ingredient can bring to your dish.

Bacon Wrapped Gorgonzola Fig Burgers with Balsamic Glaze

Did anyone watch that season of Top Chef with the watermelon gorgonzola salad? I don’t remember who made it, but I remember that he tried something unique, something most people would never do. I remember Tom Colicchio hated it, and said it was totally wrong, but Chef Tom ain’t got nothin’ on these burgers. šŸ˜‰

Bacon Wrapped Gorgonzola Fig Burgers with Balsamic Glaze

I’ve always loved the fig/gorgonzola combo, so I stuffed them inside my burger, then I wrapped that sucker in center cut bacon to add smokiness and some extra bold, salty flavor–wrapped around where it can stand out and be an attention whore, not tucked inside with the lesser-known ingredients. Then to bring it all together, and add an extra hint of sweetness, I reduced some balsamic vinegar on the stove until it was thick, syrupy and sweet. Careful, the fumes are INTENSE (think vinegar straight up your nose), but the end result is totally worth it. A unique burger that you won’t find at you local burger joint, with rich depth of flavor, yet still deceptively simple and easy to put together. There is nothing like it.

Print
Bacon Wrapped Gorgonzola Fig Burgers with Balsamic Glaze

Prep Time: 5 minutes

Cook Time: 30 minutes

Total Time: 35 minutes

Yield: 4 burgers

Serving Size: 1 burger

Bacon Wrapped Gorgonzola Fig Burgers with Balsamic Glaze

Ingredients

    For the burgers:
  • 1 lb extra lean ground beef (96% preferred)
  • 1/3 cup chopped dried mission figs
  • 1/4 cup crumbled gorgonzola cheese
  • pinch each salt and pepper
  • 4 slices center cut bacon
  • For the balsamic glaze:
  • 1/2 cup good quality balsamic vinegar
  • To assemble:
  • 4 whole grain buns (whole wheat, brown rice, etc)
  • 2 roma tomatoes, sliced
  • lettuce of choice

Instructions

  1. Begin with the balsamic glaze by pouring balsamic vinegar into a small sauce pan over high heat. Bring to a boil and reduce to medium-medium high to simmer. Stir occasionally until sauce has reached desired thickness. This took me about 30 minutes for a very syrupy glaze. 20-30 minutes should be all you need. Once desired consistency is reached, remove from heat immediately.
  2. In a large bowl, gently combine ground beef, figs, gorgonzola cheese, salt and pepper until ingredients are just incorporated. Form into 4 equal-sized patties. Press your thumb down into the center of each patty to create a small indent. Wrap each burger with a slice of bacon.
  3. Grill over medium heat beginning with the edge of the bacon side facing down until burgers have reached desired doneness, about 5 minutes each side. Transfer to buns and add lettuce and tomato. Drizzle with balsamic glaze.
3.1
http://www.arismenu.com/bacon-wrapped-gorgonzola-fig-burgers-with-balsamic-glaze/

Looking for some other burger recipes for summer? Like I said, I’ve been on a bit of a kick…

Buffalo Turkey Burgers

Spicy Chipotle Cheeseburgers

Thai Peanut Turkey Burgers

BBQ Bacon Ranch Burgers


Or if you don’t eat meat, I have a few veggie options too!

Sun-dried Tomato & Basil White Bean Burgers (vegan + gluten-free)

Chipotle Black Bean Burgers (vegan + gluten-free)

Filed Under: Dinner, Entree, Gluten-free, Holiday & Seasonal, Sandwiches, savory, Summer · Tagged: bacon, burger, dinner, figs, gorgonzola, grilling, lunch, recipe, summer

Drink & Dish: Buffalo Turkey Burgers

June 6, 2013 · by Ari · 14 Comments

Bold and spicy buffalo turkey burgers topped with a creamy buffalo sauce and crumbled blue cheese. A simple, easy weeknight meal that everyone in your family will enjoy!

Buffalo Turkey Burgers

Growing up, I always wondered “Why is my dad SO weird????”Ā He wore two different color socks, he was never on time, he listened to weird music, and he didn’t dress like any of the other dads.

Buffalo Turkey Burgers

But let’s be honest here…I am totally weird, and nothing like other humans, and I wouldn’t have it any other way. My dad taught me to be myself, the importance of birthdays, and how to be the most sentimental human on the planet. I’m not entirely sure I’m grateful for that last one…

Buffalo Turkey Burgers

My dad doesn’t eat meat, so he would actually hate this recipe (sorry dad…), but I figured I’d pick a Father’s Day dish that most dads would appreciate, and most guys I know love a good burger. Maybe I was a man in a former life?

Buffalo Turkey Burgers

Anyway, these would be perfect for (almost) any man in your life, and ummm you MUST go immediately over to Nicole’s blog to check out her BACON BROWN SUGAR OLD FASHIONED. Yes, I DID just say that. Best.Drink.Ever. Check out the latest episode of Drink & Dish to see the secret to making a perfectly cooked burger, and how Nicole makes the world’s best drink!


Print
Buffalo Turkey Burgers

Prep Time: 5 minutes

Cook Time: 15 minutes

Total Time: 20 minutes

Yield: 4 burgers

Serving Size: 1 burger

Buffalo Turkey Burgers

Ingredients

    For the buffalo ranch dressing:
  • 1/2 cup nonfat plain Greek yogurt
  • 1 tbsp buffalo sauce (more or less depending on desired spiciness)
  • 1/2 tsp ranch seasoning
  • For the burgers:
  • 1 lb lean ground turkey (93-96%)
  • 2 tbsp buffalo sauce
  • Extras:
  • 4 whole grain buns (whole wheat, brown rice, whatever you like)
  • 1/4 cup crumbled bleu cheese
  • 1/4 cup finely chopped celery
  • Mixed greens (about a small handful per burger)

Instructions

  1. To make the buffalo ranch sauce, combine yogurt, buffalo sauce and ranch seasoning in a small mixing bowl. Set aside.
  2. In a medium bowl, combine ground turkey with 2 tbsp buffalo sauce. Form into 4 equal-sized patties. Press your thumb down into the center of each patty to create a small indent.
  3. Grill over medium heat until completely cooked throughout, about 5-7 minutes each side.
  4. Transfer burgers to buns, and top each burger with about 2 tbsp buffalo ranch sauce, a handful of greens, and a tablespoon each of bleu cheese and celery. Serve immediately. Leftover burgers and sauce can be stored in separate airtight containers in the fridge for 5-7 days.

Notes

Taste the sauce before serving--if it is too spicy, add more yogurt. If it is not spicy enough add more buffalo sauce.

Extra lean ground beef may be substituted for ground turkey.

Buns may be omitted, and burgers may be served salad style if desired.

3.1
http://www.arismenu.com/drink-dish-buffalo-turkey-burgers/

Filed Under: Dinner, Drink & Dish, Entree, Gluten-free, Lunch, Sandwiches, savory, Summer · Tagged: buffalo, burgers, dinner, drink and dish, father's day, greek yogurt, grilling, summer, turkey burger

Guacamole Chicken Salad

May 30, 2013 · by Ari · 25 Comments

Guacamole Chicken Salad #glutenfree #dairyfree

My name is Ari, and I have a chicken salad problem.

Guacamole Chicken Salad #glutenfree #dairyfree

There, I admit it. I just…I get on these kicks, and I have to make something every way humanly possible until I decide I’m bored, then I move on to the next best thing. Right now, I enjoy about 3 meals. Burgers, hot dogs (just you wait…so many are coming), and chicken salad (duh). At least my tastes seem to be seasonal?

http://arismenu.com/curried-chicken-salad/

So I actually realized I’ve been holding out on you guys. I’ve never actually posted my guacamole recipe. That’s probably because, until now, I had absolutely no idea what it was. I always just messed with a few key ingredients until it tasted the way I wanted. That’s the best part about guacamole–mess it up? Oh, just add more of something else, and it’s sure to even out eventually.

Guacamole Chicken Salad #glutenfree #dairyfree

So for the first time in my life, I measured out every single ingredient for my guacamole. Because I didn’t think using instructions like “Add salt until it’s salty enough” really counted as “quality content”. And I don’t mean to brag, but my guacamole is AWESOME! Spicy, fresh and creamy–it gets requested all.the.time.

Guacamole Chicken Salad #glutenfree #dairyfree

So I made it, then I added a rotisserie chicken, some tomatoes, and after all the photography was done, I had the brilliant idea to add dried cranberries. Oh Em Gee. ADD THE DRIED CRANBERRIES!!! I’m sorry they’re not in the picture. Add them anyway. You’re welcome.

This is legit the best chicken salad I have EVER tasted. It lasted about 3 days, and Steve and I were fighting each other for it. It’s perfect for all you dairy-free folk, and anyone who loves guacamole, or chicken, or food in general.

Print
Guacamole Chicken Salad

Prep Time: 10 minutes

Total Time: 10 minutes

Yield: 6-8 servings

Guacamole Chicken Salad

Ingredients

  • 2 large (or 3 small) avocados, peeled and pitted
  • 1 lime, zest & juice
  • small handful fresh cilantro
  • 3 cloves garlic, finely chopped
  • 1/2 jalapeno, finely chopped (remove stems and heat for less heat)
  • 1 tsp cumin
  • generous pinch each salt and pepper
  • 1/4 cup red onion, finely chopped
  • 1/2 cup cherry tomatoes, halved
  • 1/3 cup dried cranberries (optional, but recommended)
  • 10-12 oz cooked and shredded chicken (I used one rotisserie)

Instructions

  1. In a large bowl, combine avocado, lime (zest and juice), cilantro, garlic, jalapeno, cumin, salt and pepper. Use an immersion blender to blend all ingredients together until smooth and creamy, about 1 minute. Blend for less time if you like a thick and chunky consistency.
  2. Stir in onion, tomatoes, cranberries and chicken. Serve immediately, or store in an airtight container with half a lime (this prevent browning) for up to 5 days.
3.1
http://www.arismenu.com/guacamole-chicken-salad/

Want more chicken salad options? I have lots (and none of them have mayo)!

Curried Chicken Salad

Buffalo Chicken Salad

Cranberry Apple Chicken Salad

Filed Under: Dinner, Entree, Gluten-free, Holiday & Seasonal, Low Carb, Lunch, Paleo, Salads, savory, Summer · Tagged: avocado, chicken, chicken salad, dairy free, dinner, easy, gluten free, guacamole, lunch, quick, recipe, simple

Jalapeno Popper Chicken

May 27, 2013 · by Ari · 16 Comments

Jalapeno Popper Chicken

I don’t know about you guys, but I am living in a haze of my post-long-weekend-fun. Did you guys do anything exciting for memorial day? I helped my brother move into his first apartment, celebrated my mom’s birthday, and had an awesome day at Lake Pleasant with Nicole. Oh, and then I spent actual Memorial Day creating recipes, meal planning, grocery shopping, and attempting productivity. Now? I just want to lay around and be lazy.

Jalapeno Popper Chicken

It’s always those lazy nights that I feel like throwing in the towel and hitting up Chipotle (honestly, does Chipotle EVER not sound good?) that I end up coming up with some of my favorite recipes. A quick survey of the fridge and pantry, throw a few things together in about 5 minutes, stick it in the oven and hope for the best.

Jalapeno Popper Chicken

I know you guys love recipes like that too. Who wants to cook healthy food if it means spending your entire life in the kitchen? Umm, I love cooking, and that sounds awful even to me! This chicken is breaded and crispy and filled with cheese and jalapeno creating the unmistakable flavor of a jalapeno popper (one of my favorite bar food appetizers) in a healthy, simple dinner. I fell in love with it at first bite, and you better believe it will become one of my I-don’t-feel-like-cooking staples.

Print
Jalapeno Popper Chicken

Prep Time: 10 minutes

Cook Time: 30 minutes

Total Time: 40 minutes

Yield: 2 servings

Serving Size: 1 x 6oz chicken breast

Jalapeno Popper Chicken

Crispy, breaded chicken breast stuffed with roasted jalapeno and cheese. It tastes like a jalapeno popper for dinner!

Ingredients

  • 1 cup whole grain bread crumbs (brown rice, whole wheat, etc.)
  • dash cayenne pepper
  • generous pinch each salt and pepper
  • 1 jalapeno, ribs and seeds removed
  • 2 cloves garlic
  • 1 tsp olive oil
  • 2 x 6 oz chicken breasts, butterflied
  • 1 oz goat cheese (or cream cheese)
  • 2 egg whites, beaten

Instructions

  1. Preheat oven to 375. Place a cooling rack inside of a cookie sheet and spray lightly with nonstick spray. Set aside.
  2. Combine bread crumbs, cayenne, salt and pepper in a large shallow bowl. Set aside.
  3. Place jalapeno and garlic on a small piece of tin foil. Lightly drizzle with olive oil. Broil until softened, about 10 minutes. Keep an eye on it to make sure the garlic doesn't burn. Roughly chop jalapeno, and finely chop garlic.
  4. Divide cheese, jalapeno and garlic between the center of the two chicken breasts. Fold chicken back over on top of the fillings. Secure with a toothpick.
  5. Place beaten egg whites in a large shallow bowl. Drench chicken in egg whites, then coat completely in bread crumb mixture and place on prepared baking sheet. Repeat with remaining chicken.
  6. Bake until cooked throughout and juices run clear, about 30 minutes.
3.1
http://www.arismenu.com/jalapeno-popper-chicken/

Filed Under: Entree, Gluten-free · Tagged: cheese, chicken, dinner, easy, jalapeno, jalapeno popper, recipe, simple

« Previous Page
Next Page »
Image Map

Popular Posts

Tart Cherry Margaritas: The perfect, refreshing margarita--lightly sweet with a punch of tequila

Tart Cherry Margaritas

90+ Healthy Recipes for Breakfast, Lunch, Dinner & Dessert

90+ Healthy Recipes for Breakfast, Lunch, Dinner & Dessert

The Ultimate Peanut Butter Cup Brownie Cookies: Rich, fudgy, brownie-like chocolate cookies stuffed with melty peanut butter cups!

Ultimate Peanut Butter Cup Brownie Cookies

Drink & Dish: Cafe Au Lait Cupcakes

Crockpot Chicken Enchilada Soup

Subscribe via Email:

Enter your email address:

Save an additional $30 on Blendtec Factory Recertified Blenders + Free Shipping

Featured Here

recipe redux
Certified Yummly Recipes on Yummly.com

Member Of…

FitFluential Is Fitness Found
AZ Bloggers Network
az 150 photo az150_zpsfb093d32.gif

Archives


Image Map

Copyright © 2023 | Innovative Child Theme by The Pixelista | Built on the Genesis Framework


Loading Comments...